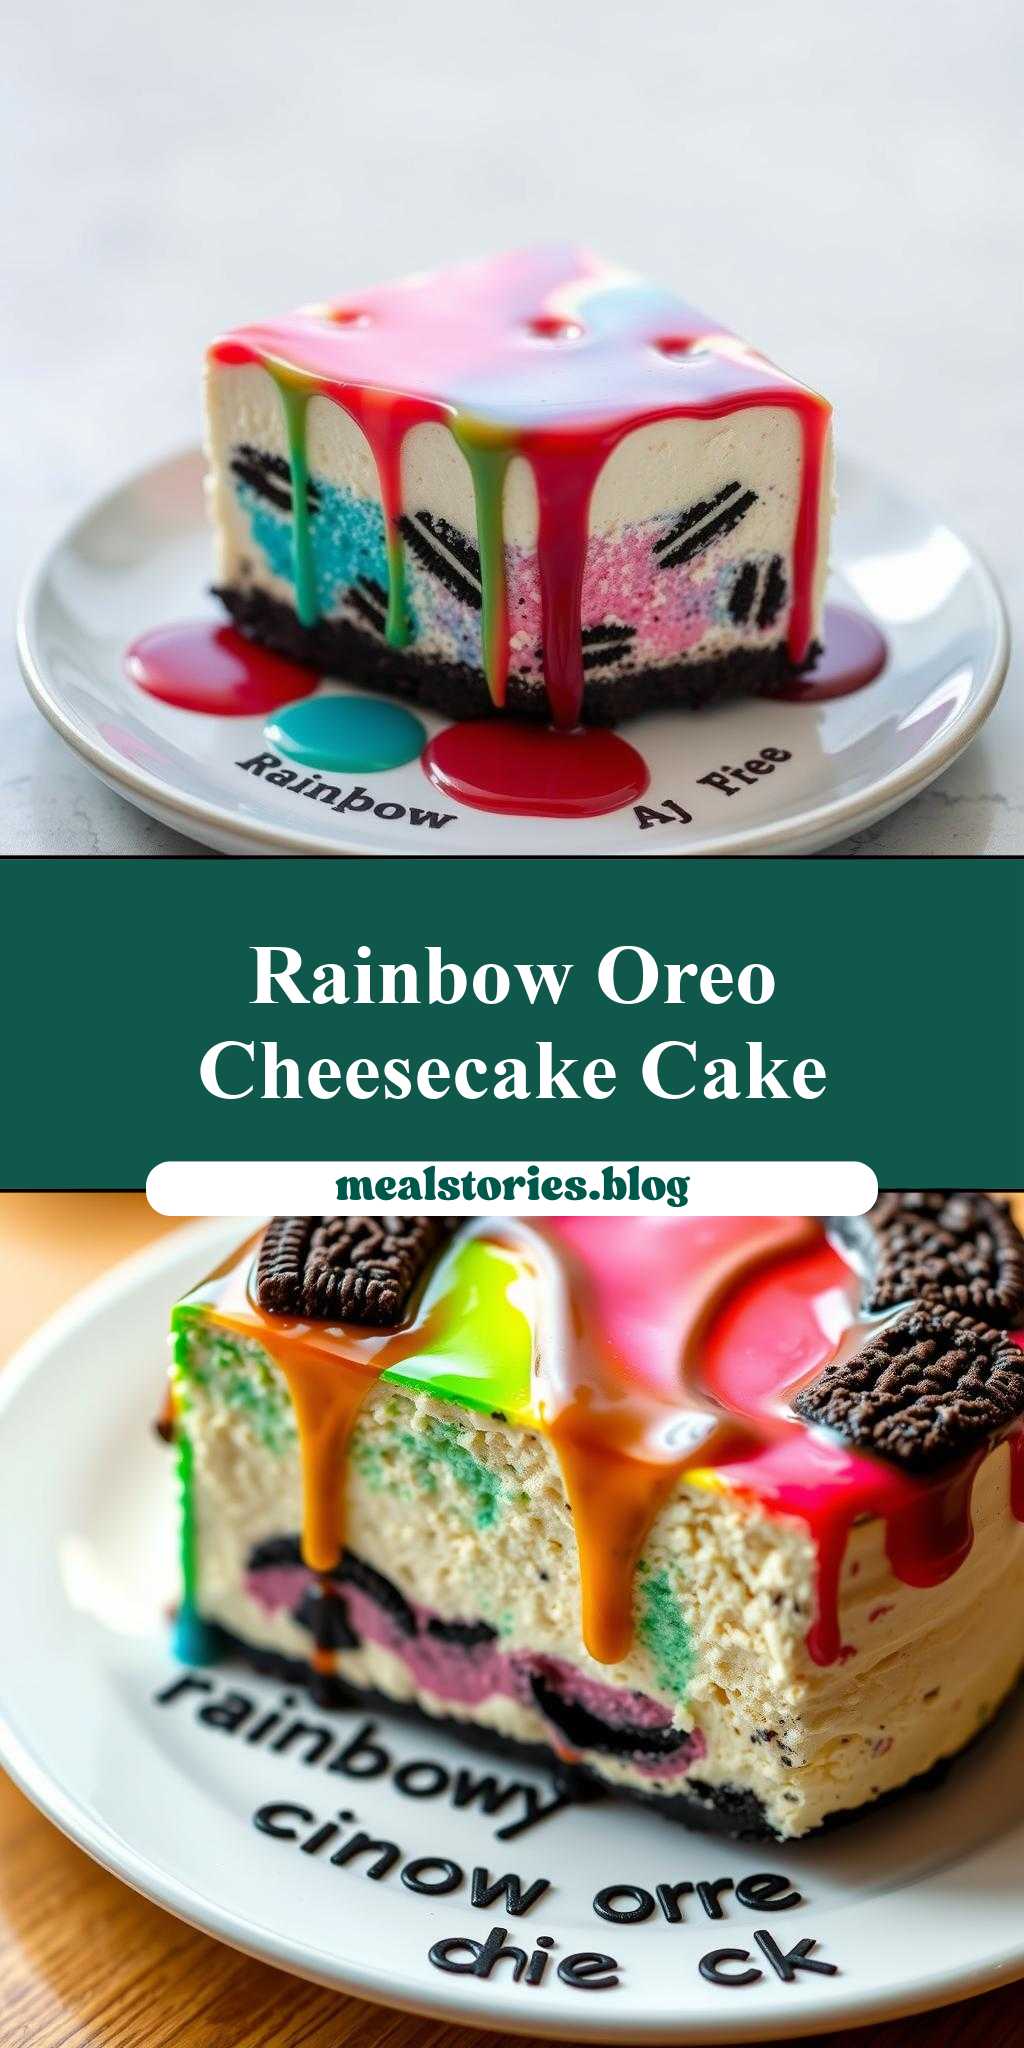
What makes a cheesecake truly unforgettable? A rainbow of colors and a crunchy Oreo crust, of course. This homemade dessert features a quick and easy drip cake method with Oreos as the star ingredient. Save this idea for your next family favorite dessert night.
rainbow oreo cheesecake drip cake on a plate with the words, rainbow oreo cheesecake drip cake
Introduction
Imagine a dessert that combines the whimsy of a rainbow, the crunch of Oreo cookies, and the creamy richness of cheesecake, all presented in a visually stunning drip cake format. The rainbow Oreo cheesecake drip cake is not just a treat for the taste buds; it’s an artistic masterpiece that can be the centerpiece of any celebration. What’s more, this show-stopping dessert is surprisingly easy to make, using everyday ingredients that are readily available in most supermarkets. With its perfect balance of flavors and textures, this cake is sure to impress both kids and adults alike. Whether you’re a seasoned baker or a beginner, this recipe is a must-try for anyone looking to add a pop of color and fun to their dessert repertoire.
Why This Works
- Flavor balance and ingredient accessibility: The combination of a dense, moist cheesecake, the crunch of Oreo cookies, and the sweetness of the rainbow drip, all work together to create a well-balanced flavor profile that appeals to a wide range of tastes. Plus, the ingredients are easy to find and work with.
- Ease of preparation: Despite its impressive appearance, the rainbow Oreo cheesecake drip cake is relatively simple to prepare. The cheesecake batter comes together quickly, the Oreo crust is a breeze to make, and the drip design, while it may seem intimidating, is actually quite straightforward once you get the hang of it.
- Impressive results with minimal effort: One of the best things about this recipe is the disproportionate ratio of effort to impact. With a minimal amount of extra work beyond a standard cheesecake recipe, you can create a dessert that looks like it was made by a professional pastry chef. This makes it perfect for special occasions or when you want to impress your guests without spending all day in the kitchen.
Key Ingredients
The main ingredients for this recipe include a package of Oreo cookies for the crust, a block of cream cheese, eggs, sugar, sour cream, and vanilla extract for the cheesecake, and a variety of food coloring and white chocolate or candy melts for the rainbow drip effect. For the cheesecake, you’ll also need graham cracker crumbs if you prefer a traditional crust over the Oreo one. Practical substitutions can be made for some ingredients, such as using low-fat cream cheese or substituting the sour cream with Greek yogurt. However, for the best flavor and texture, it’s recommended to stick as closely as possible to the original ingredients.
Instructions
- Step 1: Begin by preheating your oven to 325°F (165°C). While that’s heating up, prepare your Oreo crust by crushing the cookies in a food processor until they’re finely ground, then mixing them with a bit of melted butter until the crumbs are evenly moistened. Press this mixture into the bottom of a 9-inch springform pan. For an extra crunchy crust, you can bake it in the oven for about 10 minutes, then let it cool completely.
- Step 2: Next, prepare the cheesecake batter. In a large mixing bowl, beat the cream cheese until it’s smooth, then add the sugar and beat until combined. Beat in the eggs one at a time, followed by the sour cream and vanilla extract. The batter should be smooth and creamy. Pour the cheesecake batter over the prepared crust and smooth the top.
- Step 3: Bake the cheesecake for about 50-60 minutes, or until the edges are set and the center is just slightly jiggly. Avoid overbaking, as this can cause the cheesecake to dry out. Once it’s done, let it cool in the oven with the door ajar for an hour, then remove it and let it cool to room temperature on a wire rack.
- Step 4: For the rainbow drip, melt white chocolate or candy melts in separate bowls, coloring each one a different color of the rainbow. Spoon the colored chocolate over the cooled cheesecake in a drip pattern. You can use a spoon or a piping bag to achieve the desired effect. Let the chocolate set before serving.
Handy Tips
- One of the most helpful tips for making a successful cheesecake is to ensure that all your ingredients are at room temperature before you start. This helps the batter to mix smoothly and evenly, reducing the risk of lumps or an uneven texture. Also, don’t overmix the batter, as this can cause the cheesecake to crack or become tough.
Heat Control
Heat control is crucial when baking a cheesecake. The ideal temperature is 325°F (165°C), which is lower than for many other baked goods. This lower temperature helps prevent the cheesecake from cooking too quickly on the outside before the inside is fully set, which can lead to cracking. The baking time will depend on your oven and the size of your cheesecake, but a general rule of thumb is to bake for 50-60 minutes for a 9-inch cheesecake. It’s done when the edges are set and the center is just slightly jiggly to the touch. Avoid overbaking, as this will cause the cheesecake to dry out.
Crunch Factor
The crunch factor in this dessert comes from the Oreo crust and the texture contrast it provides against the creamy cheesecake. To enhance the crunch, make sure your Oreos are finely ground and well mixed with the melted butter. If you prefer a crunchier crust, you can bake it for a few minutes before adding the cheesecake batter. Additionally, the cooled and set chocolate drip adds an extra layer of texture, providing a nice snap when you cut into the cake.
Pro Kitchen Tricks
- A professional tip for achieving a smooth, even cheesecake is to use a water bath. This involves wrapping the outside of the springform pan in foil and placing it in a larger pan filled with hot water. The water bath helps to cook the cheesecake gently and evenly, reducing the risk of cracking. Another trick is to let the cheesecake cool in the oven with the door ajar after baking. This gradual cooling helps prevent sudden changes in temperature that can cause the cheesecake to crack.
Storage Tips
- For storing your rainbow Oreo cheesecake drip cake, it’s best to keep it in the refrigerator. Let it cool completely to room temperature, then cover it with plastic wrap or aluminum foil and refrigerate. It will keep for several days in the fridge. If you want to freeze it, it’s best to do so without the chocolate drip, as the freezing and thawing process can cause the chocolate to become discolored or separate. Wrap the cheesecake tightly in plastic wrap or aluminum foil and place it in a freezer-safe bag. Frozen cheesecakes can be thawed overnight in the refrigerator.
Gift Packaging Ideas
If you’re planning to give your rainbow Oreo cheesecake drip cake as a gift, there are several creative ways to package it. One idea is to place the cake on a decorative plate or cake stand, then wrap the entire thing in clear plastic wrap or cellophane. You can add a ribbon around the plate or a gift card on top. Another idea is to use a cake box, which can be found at most baking supply stores. Simply place the cake in the box, close the lid, and decorate the outside with ribbons or gift tags. For a more rustic look, you could use a wooden crate or a vintage suitcase, lining it with decorative paper or cloth before placing the cake inside.
Flavor Variations
- Different spices: Consider adding a teaspoon of cinnamon, nutmeg, or cardamom to the cheesecake batter for a unique twist on the traditional flavor.
- Creative toppings: Instead of the rainbow drip, you could top your cheesecake with fresh fruits, nuts, or even candy pieces. The key is to balance the flavors and textures so that the toppings complement the cheesecake rather than overpowering it.
- Ingredient swaps: For a gluten-free version, you could use gluten-free Oreos or substitute the Oreo crust with a crust made from gluten-free cookies. You could also use different types of chocolate for the drip, such as dark, milk, or white chocolate, depending on your preference.
Troubleshooting
- Texture problems: If your cheesecake turns out too dense, it may be because the batter was overmixed. If it’s too soft, it might not have been baked long enough. Always check for doneness by gently jiggling the pan; the edges should be set, and the center should be just slightly jiggly.
- Ingredient replacements: If you’re missing an ingredient, there are often substitutions you can make. For example, if you don’t have sour cream, you can use Greek yogurt or even a mixture of milk and lemon juice as a substitute in a pinch.
- Over/undercooking signs: An overcooked cheesecake will be dry and cracked, while an undercooked one will be too soft and jiggly in the center. Keep an eye on your cheesecake as it bakes, and check it frequently towards the end of the baking time to avoid overcooking.
FAQs
- Can I freeze it? Yes, you can freeze the cheesecake, but it’s best to do so without the chocolate drip. Wrap it tightly and place it in a freezer-safe bag. It can be thawed overnight in the refrigerator.
- Is it gluten-free? The original recipe uses Oreos, which contain gluten. However, you can make a gluten-free version by using gluten-free Oreos or substituting the crust with a gluten-free alternative.
- Can I double the recipe? Yes, you can double the recipe, but keep in mind that you’ll need to adjust the baking time accordingly. A larger cheesecake will take longer to bake, so check it frequently to avoid overcooking.
Conclusion
Making a rainbow Oreo cheesecake drip cake is a fun and rewarding baking project that’s sure to delight both kids and adults. With its colorful appearance and delicious combination of textures and flavors, it’s the perfect dessert for any occasion. Don’t be intimidated by the drip design; with a little practice, you’ll be creating professional-looking cakes in no time. Remember to have fun with the recipe, experiment with different flavors and toppings, and don’t hesitate to reach out if you have any questions or need further guidance. Happy baking, and enjoy your beautiful and delicious rainbow Oreo cheesecake drip cake!
rainbow oreo cheesecake drip cake on a plate with the words, rainbow oreo cheesecake drip cake
A colorful and delicious dessert combining the whimsy of a rainbow, the crunch of Oreo cookies, and the creamy richness of cheesecake, presented in a visually stunning drip cake format.
🥘 Ingredients
👩🍳 Instructions
-
1Preheat the oven to 325°F (165°C). Prepare the Oreo crust and press it into the bottom of a 9-inch springform pan.
-
2Prepare the cheesecake batter by beating the cream cheese, then adding the sugar, eggs, sour cream, and vanilla extract. Pour the batter over the prepared crust.
-
3Bake the cheesecake for about 50-60 minutes, or until the edges are set and the center is just slightly jiggly. Let it cool in the oven with the door ajar for an hour, then remove it and let it cool to room temperature.
-
4For the rainbow drip, melt white chocolate or candy melts in separate bowls, coloring each one a different color of the rainbow. Spoon the colored chocolate over the cooled cheesecake in a drip pattern. Let the chocolate set before serving.